Ensure Proper Drainage with Weep Holes for Retaining Walls
Proper Drainage for Retaining Walls — ARC Excavation Inc.’s Practical Guide to Components and Solutions
Keeping subsurface water from building hydrostatic pressure behind a retaining wall is the single best way to protect its stability and avoid early failure. This guide walks through how gravel backfill, perforated pipe, weep holes and geotextile fabric work together to move water away, prevent erosion, and extend a wall’s service life. You’ll read why Florida’s weather and soils make drainage essential, which contractor-grade materials and installation details matter most, how to spot common failure modes, and simple maintenance steps to keep systems working. For homeowners and property managers in Jacksonville, Yulee, and nearby communities, ARC Excavation Inc. pairs hardscaping and drainage know-how with professional base preparation and proven drainage solutions — request a free, no-obligation quote and we’ll evaluate your site and share a clear plan. This article covers Florida-specific factors, component specs, a contractor-level installation walkthrough, retrofit fixes, maintenance checklists, and concise answers to common questions.
Why proper drainage matters for retaining walls in Florida
Without good drainage, hydrostatic pressure and soil saturation can push walls outward, causing cracks, bulging or collapse — so drainage isn’t optional, it’s a design requirement. Florida’s frequent heavy rain and varied soils (from fast-draining sands to pockets of clay) make water buildup likely unless a deliberate drainage plan is installed. A properly designed system improves stability, lengthens the wall’s life, and cuts maintenance by channeling water away and limiting erosion. Understanding these local drivers helps you choose materials and installation techniques that match site hydrology and soil behavior and reduce long-term repair costs.
For Florida properties, a good retaining wall drainage system delivers three clear benefits:
- Stability: Reduces lateral water pressures that cause leaning and bulging.
- Longevity: Keeps moisture levels in check to slow material deterioration.
- Erosion control: Directs flow to protect soil and usable landscape areas.
Those benefits depend on designing the system to match local rainfall intensity and soil permeability — which brings us to how hydrostatic pressure forms and how Florida soils influence performance.
How hydrostatic pressure affects wall stability
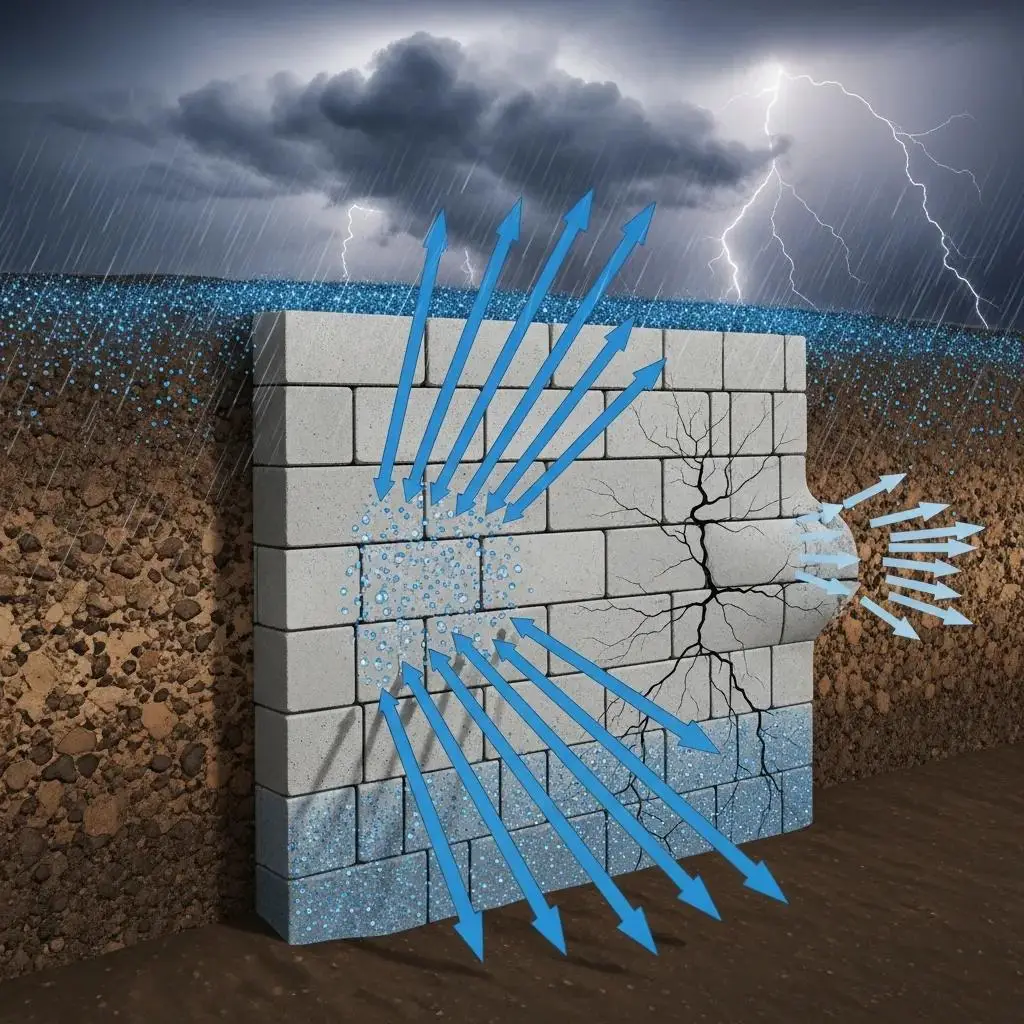
Hydrostatic pressure is the sideways force from water-saturated soil behind a wall. As soils saturate during and after storms, lateral loads increase quickly and can show up as bowing, cracks, mortar separation or, in extreme cases, failure. For example, a clay pocket that soaks up stormwater can produce lateral pressures far higher than dry soils, accelerating movement. Letting water out through weep holes, a continuous drain layer and a properly sloped outlet pipe cuts those forces and helps the wall return to equilibrium.
Retaining Wall Design: Withstanding Soil and Water Pressure Forces
Every retaining wall supports a soil “wedge” that’s exposed to lateral forces from shifting ground or water pressure. The wall must be designed to resist those forces.
Seeing hydrostatic pressure as the main failure driver guides where to place drainage components behind the wall — details we cover next.
How Florida’s climate and soils influence drainage choices
Florida has frequent, intense storms and seasonally high groundwater, both of which raise the risk of soil saturation behind walls. Sandy soils let water move quickly but can also let runoff infiltrate fast; clay pockets hold water and keep pore pressures high long after rain stops. That contrast means designs should adapt: sandy sites need secure outlets and erosion control, while clay-prone areas benefit from thicker gravel zones, reliable perforated drains and careful grading to limit infiltration. A localized assessment of soil type, stormwater flow and seasonal water-table changes is essential before specifying drainage depth, pipe slope and termination points.
Choosing the right approach for local conditions lowers risk and informs the material and installation specs that follow.
Key components of an effective retaining wall drainage system

An effective system uses complementary components — gravel backfill, perforated drain pipe, weep holes and non-woven geotextile — each with a distinct role in collecting, filtering and conveying water. Gravel provides a high-permeability zone behind the wall, the perforated pipe captures and routes that water, weep holes offer direct face drainage and visual confirmation of flow, and filter fabric keeps fines out of the aggregate. When dimensioned and placed correctly, these parts relieve hydrostatic pressure, reduce clogging risk and preserve structural capacity.
Main components in practice:
- Gravel backfill: angular crushed stone (commonly 3/4-inch) installed directly behind the wall to form the drainage zone and add granular support.
- Perforated drain pipe: typically 4-inch PVC or HDPE set at the base with a minimum slope to an outlet.
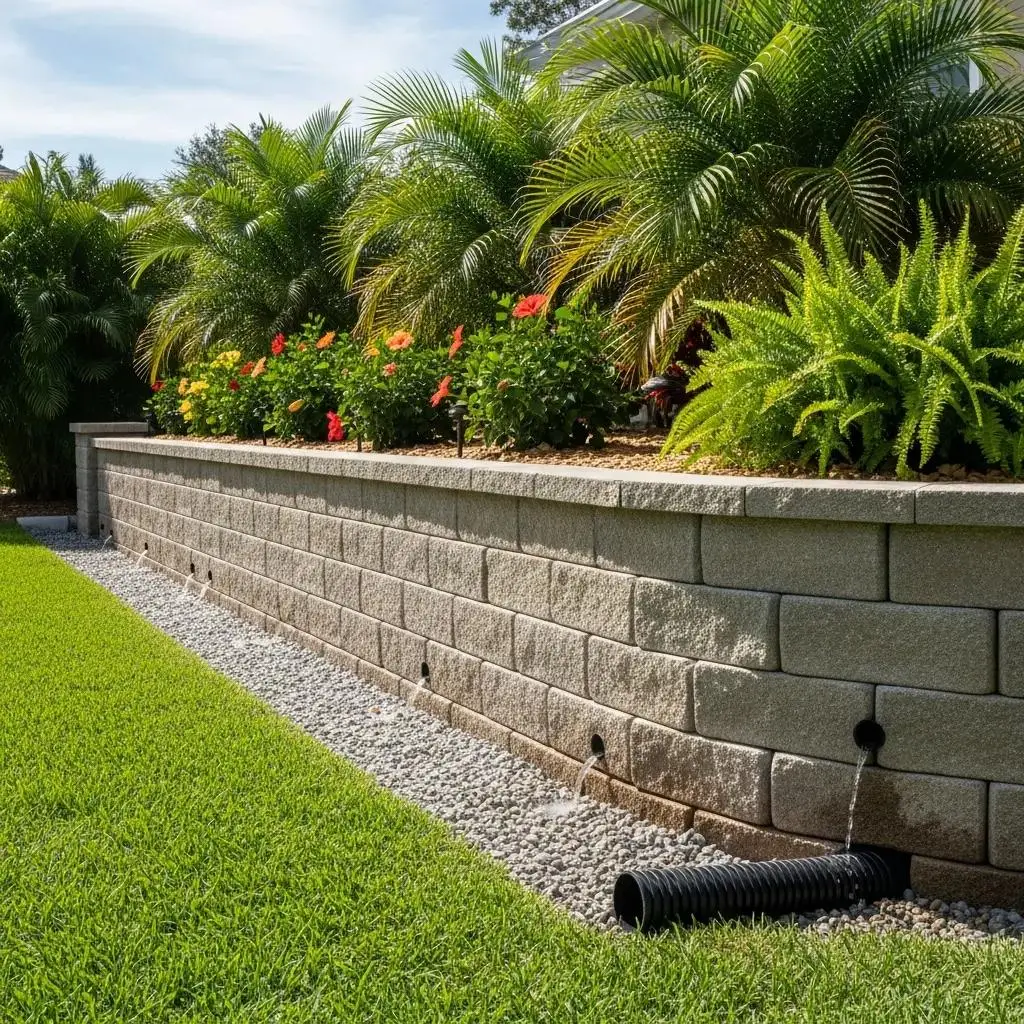
- Weep holes: openings along the wall face that provide immediate pressure relief and a visible sign that the system is working.
- Geotextile fabric: non-woven filter fabric placed between soil and aggregate and wrapped around pipe where appropriate to reduce clogging.
These elements combine to make a dependable drainage assembly. The table below summarizes contractor-grade specs and their purpose for quick reference.
| Component | Key Attribute | Typical Specification |
|---|---|---|
| Gravel backfill | Particle type & depth | Angular crushed stone, 3/4-inch; 12–24 inches depth |
| Perforated drain pipe | Diameter & placement | 4-inch perforated PVC/HDPE; laid at base with 1–2% slope |
| Weep holes | Spacing & size | 2–4 inch diameter; spaced 3–7 feet apart depending on wall height |
| Geotextile fabric | Type & placement | Non-woven filter fabric; between soil and aggregate, wrapped around pipe |
How gravel backfill supports drainage and stability
Gravel backfill creates a high-permeability zone that channels seepage away from the wall while providing granular support that resists settlement and lateral movement. Angular 3/4-inch crushed stone locks together to form a stable matrix, minimize collapsing voids and keep permeability consistent under load. Typical depths range from 12 to 24 inches depending on wall height and soil conditions; light, controlled compaction prevents excessive settlement while preserving flow paths. Clean, well-graded angular aggregate outperforms rounded or mixed-fines material in both drainage and shear resistance.
Used with filter fabric and a perforated pipe, gravel forms a continuous drainage path that prevents pore-pressure buildup and progressive failure.
How perforated drain pipes move water away
Perforated drain pipes collect water from the gravel zone and carry it to a safe outlet so it can’t pool at the footing. Standard practice uses 4-inch perforated PVC or HDPE placed at the lowest elevation behind the wall, with a continuous fall of at least 1–2% toward a daylight outlet or connection to a storm system. Wrapping the pipe in non-woven geotextile keeps fines out and reduces clogging, while surrounding the pipe with clean gravel ensures even flow into the perforations. Outlet details like a protected discharge or splash pad prevent erosion where water leaves the pipe.
Optimizing Horizontal Drain Pipes for Retaining Wall Groundwater Pressure Dissipation
Horizontal drain pipes are engineered to dissipate groundwater and reduce pore pressure behind retaining walls. Studies using 3‑D models show how pipe size, depth and length shape the equalized pressure contours around a drain and influence overall drainage performance.
Consistent slope, a stable outlet and fabric protection help pipes function longer and reduce the need for frequent cleaning or excavation.
Why weep holes matter for pressure relief
Weep holes give immediate, local relief by letting trapped water escape through the wall face, lowering lateral pressure between larger drainage events. Common sizes are 2–4 inches in diameter and spacing is typically 3–7 feet, adjusted for wall height and expected inflow; closer spacing is advisable for taller or heavily saturated walls. Adding short internal pipes, gravel-filled pockets or screens reduces blockages while keeping the flow visible. Weep holes work with subsurface drains to provide redundancy and a quick check that the system is active after storms.
Paired with a continuous drain layer and an outlet pipe, weep holes help prevent single-point failures.
How geotextile filter fabric prevents clogging and erosion
Non-woven geotextile fabric separates fine native soils from the aggregate drainage layer, letting water pass while holding back particles that would otherwise migrate into gravel or pipe and reduce permeability. Non-woven, needle-punched textiles are preferred for their balance of filtration and transmissivity; they’re placed between soil and aggregate and used to wrap pipe sections where appropriate. Proper overlap and secure placement prevent soil intrusion during backfill and slow the rate at which fines close drainage voids. Over time, geotextiles extend system life by limiting clogging and maintaining predictable flow paths.
Correct fabric selection and installation — matched to aggregate gradation — are essential to avoid bridging or channeling that undermines filtration.
Key Drainage Components for Long-Lasting Retaining Walls
ARC Excavation follows a contractor workflow that starts with a site assessment and finishes with quality-control testing, tailoring drainage to the site’s soils, slopes and rainfall exposure. We focus on professional base prep, precise excavation for pipe and gravel, proper geotextile wrapping, and final grading to move surface water away from the wall. Our approach pairs effective drainage with aesthetic and structural considerations to prevent erosion, keep usable landscape areas intact, and protect your retaining-wall investment. For Jacksonville, Yulee and nearby areas, ARC offers free, no-obligation quotes and straightforward pricing to help property owners choose the right repair or new-install solution.
The table below summarizes the installation phases, materials/specs and expected outcomes for transparency.
| Step | Materials / Specs | Expected Outcome |
|---|---|---|
| Site assessment | Soil probe, grade survey | Tailored design and scope |
| Excavation & bedding | Excavator, compacted subgrade | Stable base for pipe and wall footing |
| Drain installation | 4″ perforated pipe, 1–2% slope, wrapped in non-woven fabric | Reliable conveyance of collected water |
| Gravel backfill | 3/4″ angular crushed stone, 12–24″ depth | High-permeability drainage zone |
| Final grading & QC | Surface slope away, outlet stabilization | Long-term erosion control and verified function |
Step-by-step installation procedures
We begin with a focused site inspection to evaluate soil type, existing surface drainage and wall condition. Excavation follows to the specified depth, taking care around utilities and structures, and a stable bedding layer is prepared for the perforated pipe. The pipe is installed with the required slope and wrapped in non-woven geotextile before the gravel is placed and lightly compacted to preserve void space for flow. We test the system by running water to verify slope and discharge, complete the backfill and adjust surface grading to divert runoff away from the wall.
This sequence gives clear inspection points and helps ensure each component performs as intended.
Materials and techniques that deliver long-lasting performance
Durable drainage depends on materials that resist clogging and keep flow paths open: clean, angular crushed stone for backfill, 4-inch perforated PVC or HDPE for conveyance, and non-woven geotextile for filtration. Key installation details include consistent pipe slope (minimum 1–2%), continuous gravel contact with the pipe, correct fabric wrapping and overlap, and protected outlets to prevent erosion. ARC also emphasizes compaction that stabilizes backfill without crushing aggregate voids and performs QC checks such as water testing and visual inspection of weep holes. Together, these choices reduce maintenance and improve long-term reliability.
Performance Comparison of Retaining Wall and Abutment Drainage Systems
Current practice for drainage at retaining walls and abutments is reviewed in this study, which proposes a prefabricated composite drainage system (PCDS) as an alternative to conventional methods and compares capacity and cost-effectiveness.
Applied with site-appropriate design, these specifications create a resilient drainage system that limits future interventions.
Common retaining wall drainage problems and practical fixes
Typical issues include leaning or bulging walls, persistent pooling behind the wall, clogged subsurface drains, and erosion undermining the wall’s toe. Causes are often clogged pipes or fabric, insufficient gravel depth, poor outlet design, or grading that directs water toward the wall. Solutions range from targeted clean-outs and adding weep holes to retrofits like French drains, replacing contaminated backfill with clean aggregate, and regrading to divert surface flow. A methodical diagnosis — identifying symptoms, likely causes and appropriate corrective measures — keeps excavation and cost focused where it will have lasting effect.
The table below gives a concise problem-cause-solution matrix to help owners self-identify issues and see typical professional remedies.
| Problem | Likely Cause | ARC Excavation Solution |
|---|---|---|
| Leaning/bulging wall | Hydrostatic pressure from saturated soil | Install/repair subsurface drains, add gravel backfill, structural reinforcement as needed |
| Pooling water behind wall | Blocked outlet or insufficient outlet capacity | Restore outlet, add perforated pipe with proper slope |
| Clogged drains | Fabric failure or fine material intrusion | Replace contaminated backfill, install proper geotextile and pipe wrap |
| Erosion at toe | Improper outlet termination | Stabilize outlet with riprap or splash pad and regrade discharge area |
What causes leaning, bulging or pooling behind walls?
These signs usually point to excess lateral pressure from saturated soil, a break in drainage continuity, or both — and soil type affects how quickly movement appears. Leaning and bulging often follow prolonged hydrostatic load where drainage capacity is insufficient; pooling indicates blocked drains, inadequate gravel zones or outlet failure. Look for cracked mortar, bulged segments or water stains on the face — these symptoms suggest drainage problems rather than surface erosion alone. A proper diagnosis checks weep hole flow, probes gravel permeability and locates outlet obstructions before choosing a repair path.
Determining whether clogging or insufficient capacity is the dominant issue tells you whether a clean-out, partial retrofit or full reconstruction is needed.
How ARC Excavation repairs drainage issues
We match the repair to the diagnosed cause — cleaning or replacing clogged pipes, excavating contaminated backfill and replacing it with clean angular gravel, installing or upsizing outlet pipes, and adding weep holes or French drains where appropriate. ARC enforces correct material specs and installation detail, including non-woven geotextile wrapping, proper pipe slope and stabilized outlet detailing to prevent repeat problems. For complex structural distress we coordinate wall stabilization along with drainage upgrades so repairs reduce hydrostatic load and restore capacity. Request a free site assessment and no-obligation quote to identify the most effective, long-lasting fix.
Our repair-first philosophy focuses on durable results that reduce return visits and preserve landscape use.
How to maintain your retaining wall drainage system for longevity
Regular maintenance stops slow degradation by catching clogging, outlet issues and erosion early. A simple seasonal inspection routine is effective: after big storms and at least quarterly, check visible outlets, weep holes and discharge areas for flow, sediment or vegetation that could block drainage. Remove debris from weep holes, clear surface channels to the outlet and watch for new pooling or soil loss at the wall toe. If flow drops or sediment builds up, schedule a professional clean-out or assessment to see if partial excavation or backfill replacement is needed.
Proactive maintenance costs far less than major retrofits and stabilizes performance across seasons.
Best practices for inspecting and maintaining drainage components
Use a practical checklist: verify weep hole discharge after rain, check outlet stability and erosion control, look for root intrusion or vegetation in the gravel and confirm surface grading routes runoff away from the wall. Inspect after storms, quarterly and annually for a fuller review — photograph changes to track trends. Homeowners can remove surface debris, clear leaves from weep holes and repair minor erosion; leave pipe cleaning, fabric replacement and regrading to professionals. Always take utility-location precautions and use proper safety gear on steep slopes.
Consistent documentation and small repairs stop small issues from escalating into costly structural work.
How regular maintenance prevents erosion and structural damage
Keeping drainage paths open prevents the processes that cause erosion and structural damage. When drains work, water is removed before it erodes backfill, undermines footings or increases lateral loads that drive movement. The long-term payoff is straightforward: modest seasonal maintenance is typically far cheaper than full backfill replacement or wall reconstruction caused by neglect. A simple maintenance plan and timely repairs preserve both structural integrity and the look of your retaining wall.
Applied consistently, these practices lengthen service life and reduce the need for major remediation.
Frequently Asked Questions
What are the signs that a retaining wall drainage system is failing?
Watch for a leaning or bulging wall, pooling behind the wall, and cracks or separation in mortar. Water stains on the face or plants growing in the gravel backfill are also red flags. Regular checks after heavy rain help catch problems early so you can take action before structural damage worsens.
How often should I inspect my retaining wall drainage system?
Inspect at least quarterly, and always after significant storms. Look for pooling, sediment in weep holes and erosion at the base. Timely maintenance keeps the system working and prolongs the wall’s life.
Can I install a drainage system for my retaining wall myself?
Some homeowners can handle small projects, but larger or more complicated jobs are best left to pros. Proper installation requires knowledge of local soils, drainage design and materials. A qualified contractor ensures the system is installed correctly and in line with local regulations.
What materials are best for maintaining a retaining wall drainage system?
Use clean, angular crushed stone for backfill, 4-inch perforated PVC or HDPE for drain lines, and non-woven geotextile fabric to prevent fines from clogging the aggregate. Check for sediment buildup regularly and replace damaged components when needed.
How can I improve drainage around my existing retaining wall?
Options include adding weep holes, installing additional perforated drains, improving gravel backfill permeability or regrading the landscape to divert water away. A site inspection from a drainage specialist will provide a tailored solution based on existing conditions.
What should I do if I notice erosion at the base of my retaining wall?
Address erosion promptly: inspect the drainage for blockages, stabilize the discharge with riprap or a splash pad, and regrade the area to direct water away from the toe. A professional can recommend the right stabilization and grading details.
What is the best drainage system for a retaining wall?
The most reliable approach combines multiple components: clean gravel backfill, a 4-inch perforated drain pipe at the base with a 1–2% slope, non-woven geotextile separation, and weep holes sized and spaced every 3–7 feet as appropriate. That mix balances collection, filtration, conveyance and direct pressure relief. Relying on a single element (for example, only weep holes) leaves the system vulnerable to clogging or localized failure — redundancy improves reliability.
This integrated layout is recommended for most Florida sites and serves as a baseline for professional installations.
Do all retaining walls need drainage?
Most do — especially walls over a few feet tall, walls holding wet soils, or walls in high-rainfall areas. Even modest water accumulation raises lateral pressure noticeably. Very low garden edgings or specialized waterproofed structures may be exceptions, but when in doubt get a site-specific soil and water assessment to define the proper scope.
When you choose drainage, you reduce long-term risk and maintenance for most properties.
How deep should retaining wall drainage be installed?
Guidance places the perforated pipe at or slightly below the footing elevation, with 12–24 inches of gravel backfill behind the wall face depending on wall height and soil type — and deeper drains where clay soils or high groundwater exist. The aim is an uninterrupted drain path from the wall face to the outlet so water cannot collect at any elevation. Adjustments are made based on site assessment to avoid foundations or utilities and to ensure capacity.
Design depth balances drainage capacity, excavation feasibility and local conditions.
How do you fix a retaining wall drainage problem?
Start by diagnosing the symptom, find blocked outlets or contaminated backfill, try a mechanical clean-out if accessible, and implement the retrofit needed — a French drain, replacement of contaminated gravel with clean aggregate, added weep holes, or outlet stabilization. Severe movement may require combined structural repair and drainage replacement. For complex cases, contact a qualified contractor for a free assessment and a no-obligation quote outlining the most durable solution.
Prompt, focused repairs stop small drainage issues from becoming major structural failures.
This article covered Florida-specific considerations, component specifications, contractor-level installation steps, common failures and practical maintenance. If you own property in Jacksonville, Yulee or nearby areas and want a professional evaluation, ARC Excavation Inc. delivers expert hardscaping and drainage services, clear quotes and durable results tailored to local soils and storm patterns. Request a free, no-obligation quote for a site assessment and a repair or installation plan.
Conclusion
A robust drainage system is essential to protect retaining walls and avoid costly repairs. By accounting for Florida’s specific climate and soil behavior, property owners can choose the right materials and installation techniques. Regular maintenance plus professional installation provide long-term performance and peace of mind. For a tailored solution that fits your site, request a free, no-obligation quote from ARC Excavation Inc. today.